Wednesday, May 12, 2010

4015 words about spring

The transition from plant to food

More mesclun

Welcome to the flock

Thinning the radishes


Monday, May 3, 2010

Early Spring Plantings

Snow peas before installing the trellis of branches
It's no surprise to long-time Gallupians, but snowstorms in May are to be expected. The moisture they provide is a nice respite from the seemingly constant drying winds of April and May, but the cold night-time temperatures that follow these storms are an early spring gardeners nemesis. That phrase, 'early spring gardener,' is almost surely an oxymoron in Gallup. And yet, I've been steadily planting cold season crops since mid-march with pretty encouraging results- fingers are crossed considering there's still more than a month before the average last date for frost in early June. I posted about the snow peas and onions when I planted them and both are doing great. With a light layer of straw mulch over the soil the snow peas are about 6" high and just starting to curl their tendrils around the cut tree branches (great use for pruned elms) that form their trellis.
The onions are 9-10" tall and amazingly haven't been crushed by the plodding footsteps of the neighborhood dogs (my dogs have self-trained themselves to avoid the beds of fluffy soil and straw:), though it's required me to be super vigilant at keeping the fence gates closed. Next to these onions I also planted some long-leafed spinach and radishes that have proven to be self-sufficient in the cold and are a week or two away from harvest size.
Late-afternoon light on the shallots and carrots
Carrots and shallots were planted next in late March. I've had good luck with the latter; shallots certainly share the 'anti-freeze' characteristics, common to the other members of the onion family. The carrots were planted too soon. I covered them with only a light layer of straw and kept the bed moist with daily watering (carrot's tiny seeds are barely covered with soil when seeded and prone to drying out during the relatively long germination period, and like most root-crops they don't like to be transplanted). After a month, the first sprouts have begun to appear, but it seems as if only 10-25% of seeds successfully germinated.
Cole crops before mulching with straw
In mid-April I planted my cole crops in a clay bed in the back that had been heavily amended with manure. Green and red cabbage, brocolli, brussel sprouts, and collard greens filled the 25'x4' bed. These were really well watered in and mulched thickly with straw. They're all doing great. Next to the cole crops are the beds containing garlic, corn and pintos, and then more onions.
The back-garden beds- notice the shiny new tiller
Also in mid-April I planted a large bed (15'x4') split between mixed lettuce and Bloomsdale spinach. This bed is under a large elm that provides mid-day shade in the summer and should provide young sweet greens for a while after the lettuce in my cold-frame bolts in the full-day summer sun. This bed is covered with light blankets and sheets on any night below freezing. Even nights down to 19 degrees have failed to harm this young crop that should be ready for steady harvesting at the start of the Farmers' market season. I also companion planted this bed with summer peas, partly as a back-up against the potential loss of the greens to frost, partly to provide shade, and partly for the nitrogen fixing benefits of the legumes. Now that everything looks like it's coming through, I'll cull many of the peas shoots for dinner.
The long-bed of summer lettuce and spinach
The last bed I've prepared was for beets. After planting them in clay soils amended with lots of peat moss and sand, I covered the beds very thickly with sheets of unseparated straw. The seeds germinated faster than expected and I pulled the straw off a day or too late and many of the sprouts had gotten 'leggy,' reaching for the light blocked by the straw. Then it snowed for two days and got really cold. This bed will probably need to be re-seeded.

Native Plant Sale and Gardening Workshop

Are these desert marigolds? Photo from the PSS flyer
Gallup's Plateau Sciences Society (PSS) is holding their annual native and xeric plant sale on Saturday, May 15 at Holiday Nursery, 9-6 p.m. While I like to joke that the only plants I care for are the edible variety, native plants provide many reasons to value and grow them: they're adapted to our climate; take little maintenance once established; consume little water; attract beneficial insects to the garden; best of all, they're absolutely beautiful! Stop by and support this great event.

The PSS is also hosting a workshop by master gardener, Sid Gillson, called The Garden of Eating in Gallup on Friday, May 14. It will be held 1-6 p.m. at the PSS's usual meeting place at the Red Mesa Center, 105 w. Hill.

Monday, April 26, 2010

Planting Leeks

Leek transplants and their wet life-line
So last year I experimented with planting my first leeks, rather unsuccessfully I might add (planted too deep, in too heavy clay, and way too late (june) in the year). Despite disappointing leeks that were still no larger than a over-size scallion in October, I'm trying again. That's where it gets interesting, I couldn't stop at just a few pots of young leek sprouts when I saw them at Home Depot last Sunday and I ended up buying 6 pots ($3 something each), enough to transplant two 25' rows with around 160 leeks. This year I planted them in a deep trench filled with very rich and well-amended topsoil (lots of composted manure and peat moss).
Trimming the roots back
After removing the peat pot and soil they come in, I cut the tangled mass of roots back to less than an inch, and separated each of the 20+ transplants. After wetting in the soil, I planted each leek by poking a 3" deep hole with a stick and then carefully inserting the plant. A staggered planting grid kept each transplant about 6" from it's neighbor. Books and websites say that trimming the roots and leaves back is the traditional European method, but optional. I found that both are necessary. The leeks with trimmed roots (before trimming they're 5-7" long) are much easier to insert into the planting holes, and the uncut long leaves get blown around in our spring winds much more after planting--inviting stress--than the transplants with leaves trimmed to 3-4" above the ground.

Wednesday, April 21, 2010

BDCKitchen greens at the Co-op

The tangy, nutty, crunchy, and sweet shades of green

Despite eating nearly a salad a day and sharing produce with my co-workers/family 'CSA,' the harvest of baby greens from the cold frame has been fast and furious. Yet, not fast enough. The mesclun (traditional tangy spring mix) and black-seeded simpson (lighter green loose-leafed lettuce) I began the harvest with has already grown back, ready for a second harvest. The romaine and bibb lettuce germinated thickly and I have a thick stand of baby romaine hearts that are sweet and crunchy, for now. Fearing it would all start to bolt or bitter (especially the heat in-tolerant Bibb) I finally approached the manager of Gallup's La Montanita Co-op, Alicia, about selling my lettuce in their store. Struggling with once-weekly shipments of quickly withering greens from Albuquerque, she was more than willing to start carrying my surplus in the store. Hopefully, with a local in-town source of baby greens they can keep some of the freshest salad ingredients on their shelves. I'll post about the rest of my early spring plantings soon, but green onions, baby spinach, and snow peas are soon to come.

Sunday, April 18, 2010

2 of 3 sisters: Navajo corn and Hopi pintos

Navajo copper popcorn and Hopi pinto beans
On the 10th I planted my corn. This year it's Navajo copper popcorn instead of Hopi white flint corn (I just don't make my own tortillas as much as I had planned, and Marcy's air popper is effortless) and it's planted a week later than last year. I soaked and planted the little kernels with Hopi pinto beans I've saved from the past couple years harvest. I left the third sister at of the mix (squash), but I'll take the roll of that third sister: week killer. The other sisters provide shade/structure (corn) and nitrogen (beans), in addition to the wonderful edible seeds. The corn seeds I just got from Native Seeds/SEARCH and the beans the same, two (seed) generations ago.

Planting stick and seeds, ready for planting
After tilling up the garden bed, I quickly plant the seeds through the dry crumbly surface layers and into the deeper layers still moist from the winter snowpack. Navajo and Hopi varieties of corn are known for their ability to emerge from up to a foot of planting depth, though most literature I've read about these Hopi varieties details that they are usually planted in sandy soils. I've found the un-wetted soil fluffed up by a rototiller, despite having considerable clay content, must be similar to the untilled sandy fields of a traditional Hopi farmer. Seeds have little trouble emerging from deep within my canyons soils. I plant 2 corn kernels and one bean seed together into these deep moist layers of the soil with a traditional Navajo corn planting stick. With one hand and two strokes I create a depression, drop the seeds, and pack them into place. Crumbly soil falls into the hole, perfectly covering the seeds as I retract the staff. My planting stick was graciously given to me, along with a host of other garden tools, by the previous owner of my house, Ms. Begay. It's handle is worn to the shape of a strong hand, and it's point smoothed by earth-- both ends crafted perfectly by use long before I ever lay a hand on it.
A timeless stance
Nothing I know would plant these seeds better than this timeless piece of cottonwood.
UPDATE: The first sprouts emerged around May 7th.

Peach Blossoms

Loring Peach Blossom
I have 3 peach trees, and yet 5 varieties of peaches. The numerical discrepancy is because one of the trees has three different varieties grafted to a single root stock. The most vigorous of the bunch, the Loring peach, has already begun blooming. Check back to this post to see blossom dates of the other varieties and I'll post again if I actually get any peaches this year.

The arroyo orchard and gabion dam
Inspired by the Navajo's cultivation of peaches in Canyon de Chelley, I planted the three trees as bare-root stock several winters ago. I'm still looking forward to the first peaches, though this years bloom is a sure improvement over last year's single flower. Fearing the choking clay soils that seem to plague the 15 year old fruit trees in my backyard, I built a small gabion dam across the small but steep arroyo that flows through my backyard. After filling the dam with a sandy mix of soils, I armored the front with rocks. In 3 years, I've only seen surface water flowing down the canyon a handful of times, but the trees seem to love their sustainable home-- I water them only once a year in early June. Groundwater flow through the alluvial fan deposited by the arroyo takes care of the rest of the year.

Thursday, April 15, 2010

Asparagus Season

The first shoot of 2010
The heck with the groundhog or tax-day, the real harbinger of spring has arrived! Asparagus shoots came up overnight in all three of my beds planted with the herbaceous perennial. I was surprised at how synchronized their emergence was since they're planted in quite different soils, microclimates, and their ages differ by 15 years.
Zuni waffle garden of asparagus and a few other perennial herbs
I planted a couple dozen 2nd year rootstock 3 winters ago (best Christmas present ever!), and so I'm looking forward to my first full harvest season, as you can only harvest in limited quantities the second year, and none the first. The other 2 beds are much smaller, but filled with persistent asparagus planted by previous owners, yet with regular feeding, they're still productive. Last fall, after clearing off the dried stalks of last year's full grown asparagus 'ferns', I fertilized the Zuni-inspired waffle garden with well composted chicken manure and leaf mold. Blowing sand from the adjacent 'beach' provides the perfect mix of rich and sandy soil amendment. I'll harvest the shoots before they're 7" tall and turning woody, for the next 5 weeks.

Saturday, April 10, 2010

The Cabbage Patch Kids

The first harvest on it's way to the kitchen, and the harvesters!

UPDATE: In all we harvested 200+ lbs of cabbage, 50 lbs. of potatoes, and 100 yellow onions from the Chee Dodge garden this year. Not bad for a garden I left largely unattended that summer. The harvested vegetables played a role in over 10 school lunches for 410 students, with the highlight being a cabbage stew that used all the potatoes and onions, and helped secure a $40,000 grant for health initiatives at our school, some which will go to expanding and funding the garden well beyond the confines of my limited pocketbook. Some of the cleaned cabbage heads weighed well over 10 lbs. We also made the front page of the local newspaper, and prompted several PTA's at other schools to ask their principals why they didn't have a garden.

Don't tell the janitor!


The original post follows:

Ms. Witt's little gardeners getting the mulch just right
After spending nearly two weeks administering a grueling standardized test to 9 year olds, when it was done last Friday I spent the day with my second graders and the third grade as they planted the first 2010 crops in our school garden. I've grown squash, corn, and tomatoes randomly with classes in the past, but this year, with the addition of new and energetic staff at the school, the Chee Dodge Nanise Garden may finally reach towards it's potential. We have a fenced acre of land, easy access to well water, and a covered carport that will transform soon into the Outdoor Classroom. A PNM grant in 2005 paid for fencing the 1 acre garden, though the main fence isn't yet rabbit-proof.
They even made their own beds
The second graders had prepared their onions by soaking them overnight in water. They felt familiar and a little let down when the onions they were promised didn't quite live up to the similar and familiar Amaryllis bulb I revealed early this winter and now grows tall in classroom science lab. With some technical difficulty (scissors) they prepared their 4 x3 array to guide their planting of the red, yellow, and white onions.
204 'precisely' placed onion sets
The third graders planted 60+ Bonnie '50 pound' cabbage starts that are sent to all third graders in this school district. They arrived at the school unannounced and a couple weeks too early for planting (it dropped below 12 degrees on two nights since). I kept them at my house until the weather was right, and the testing over, before we planted them. We prepared the 25' beds (one for each of the 4 classes) by tilling the soil and forming a wind barrier on one side of the row. Then I tilled the bed again and the students excavated a long trench that we filled with a little manure and several bags of bagged top soil. The students planted their starts and then the drip hose was laid alongside the stems and covered with the sandy topsoil. We mulched it all with hay (soon to be covered with compost and finally topped with straw).

First blossom of the year: Apricot

Beautiful bees and blossoms
The apricot tree must somehow know that the weather forecast for the coming week shows night-time lows only in the lower thirties. Perfect for cool weather crops like brassicas (cabbage, etc) onions and peas, but too early for fruit to survive the inevitable spring freezes that are still to come this spring (into early June on average). Anyway, regardless if it bears fruit or not, it's an amazing show of white petals to watch, usually dancing with heavily laden bees. The latter so occupied and friendly that you can almost pet them. I have 3 varieties of apples, 5 varieties of peaches, and this apricot tree. I'll post the dates when each blossoms.

Wednesday, April 7, 2010

Botanical Interests seeds at Holiday Nursery

Botanical Interests Seeds
The awesome gang at Holiday Nursery have out-done themselves again! They've begun stocking relatively 'local' seeds from Botanical Interests seed company in Broomfield, Colorado. In addition to huge selection of vegetable, herb, and flower seeds in stock-- many varieties are organic, too-- custom orders (of sufficient size) can arrive in just 3 days. The seed packets have beautiful artwork on the cover, but the really neat thing is the packets are also printed on the inside with a host of detailed planting/growing/harvesting/preserving information for that specific variety. I've already had great germination results from variety of radishes, lettuce, spinach, and peas. They also have the rare yellow and striped varieties of beets!

The inside of the seed packet
The nursery has also received their spring shipments of seed potatoes (Yukon gold, red lasota, russets, and Pontiac reds); $1/pound and Cory recommends planting potatoes on May 1st. Red, yellow, and white onion sets are also available at $2.25/pound; plant those now. Please stop by and support our local nursery!

Peas, hydrated over-night and mixed with nitrogen-fixing innoculant

Tuesday, April 6, 2010

Hops

2010's Chinook Hops (3" tall)
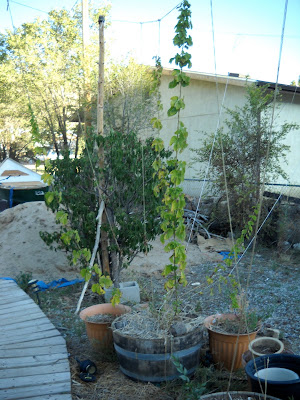
On April 2nd the first of the Chinook hops emerged from their cold, soggy wine barrel home. Planted two years ago, the Chinook (think IPA brews) variety shares half of the barrel with a rhizome of the Centennial (think Pilsner) variety, and both have proved to be one of the most eager and vigorous perennials I've ever planted. I'll supplement the warming thermal mass of rocks ringing the barrel with a blanket on nights that drop below 25; I've also used christmas lights in years past to protect the early emerging shoots. When the chance of frigid cold nights passes, I'll cut all but 2 or 3 of the strongest vines (then about 1-2' long), and encourage them to start climbing the 10' string trellis. Throughout June and July I've seen the vines grow more than 2 inches a day! In more northern climates with longer summer day lengths, hops grow to more than 20' tall. In August they start to set flowers at the top of the vine, and I've usually harvested in early September.
The hop barrel's new growth
Originally, I bought five varieties of hops from Victor's Grape Arbor in Albuquerque (Victor orders hop rhizomes of various varieties for sale each April; $4 each) with the intention of experimenting with which variety would excel in our growing climate. Poorly planned transplants killed off 3 of the varieties the first year, and the Chinook variety has always been the strongest of the remaining two. However, I can't really attribute it's good health to being better adapted to this region, as the Chinook rhizome was also the biggest (and already sprouting) one I bought that year. It's first season it grew over 8' tall and produced a harvest of flowers that filled a gallon zip-lock bag.

2009's slightly disappointing vines
As the price of hops increases every year (there was a world-wide shortage in 2008), I've intended to plant a permanent row of hops (the constantly growing rhizomes much prefer to be in the ground, than trapped in a barrel), but another season seems to have come without me committing another portion of the garden to this vining perennial.

After the initial fermentation, hops stick to the top of the carboy

Thursday, April 1, 2010

NM Game and Fish

McGaffey Lake Dam: Did this gentleman catch any fish?
April 1st marks the start of New Mexico's fishing and hunting seasons. Anglers need a new fishing license for the 2010-11 season starting today and hunting application are due in Santa Fe in less than a week!
A McGaffey Rainbow
Ice fishing on McGaffey Lake is definitely over, though this year it never really started--2' thick ice capped a 5' deep lake that seemed strangely devoid of fish. We were 'skunked' numerous times this winter fishing the shallow water, but I know fish were alive at the start of the winter because I caught what we call 'the last fish' through the ice in December. None followed. The dam has a 5 gallon/min leak spilling into the wet meadow below.(
Bill and I on McGaffey Lake in early '09
Regardless, NM offers abundant fishing opportunities ranging from stocked trout and musky in the lakes, picky bruisers on the San Juan, and wild wilderness trout in the Gila, Jemez, and numerous other mountain chains throughout the state; there not easy, but they are there, and very tasty. Around here, you'll need a Navajo Nation license to fish the lakes of the Chuska Mountains called Whiskey, Wheatfields, and Tsaile, all favorites of my student's families. I tend to fish elsewhere;) Buy your license locally at Wal*, California Supermarket on Hwy. 66 and Ford Canyon, or my favorite, get both NM and Navajo licenses at T&R Market's gas station on Hwy. 491 just north of town. Worms too, if that's your thing.

Mesquite-smoked Zuni Mountain Elk
Big game season starts with getting your permit application in by April 7th. Get it in, there are no over-the-counter deer or elk licenses in NM! You can now apply online, but that doesn't seem to improve the odds. Bill smoked the roast pictured above, and John Masci harvested the young cow elk at Rice Park this year on a private land-owners permit. The NMG&F website says 150,000 people apply for 50,000 permits; I've drawn a blank four years in a row. Sadly, according to a recent print article (sorry, no link) out-of-state applications have a much better chance of a successful draw than in-state applicants (they pay more, and 20% of the harvest is set aside for them). Turkey are pretty much the only 'big' game with an over-the-counter license and the spring season starts April 15.

Wednesday, March 31, 2010

Least Favorite Tool: the !@#$% tiller

The rented BCS 722 Harvester
So the curse of the blog has struck again! Last Friday, as I prepared for a busy weekend of preparing the raised beds for spring/summer plantings (they have to be tilled before the soil dries brick-hard) the tiller broke down again. This time is wasn't the motor, but the bearings of the fly wheel which engages the tines. C & L Saws was closed most of the weekend, and I'm still not sure if the parts are replaceable on such a cheap machine. The same day, I also noticed potentially terminal cracking around the hitch on my rusted 30 year-old trailer. Hauling manure and mixing it into the soil was looking like a nearly impossible proposition. My checkbook came to the rescue. Saturday morning I went down to Big Mike's and made arrangement to rent their BCS tiller for the weekend ($106 to rent; $3000+ to buy). Picking it up by 1 p.m., I had that awesome machine all weekend!
5 yards of fluffy horse manure
That just left the problem of manure. I'd exhausted my collection of previously collected and home-grown manure and needed quite a bit to blend into the largely un-amended native soil of my large backyard gardens. Checkbook again to the rescue. Holiday Nursery has a nice stockpile of well composted (with some green nuggets) horse manure for $20/cubic yard. I bought 5 yards worth (a dump truck holds 7 yards), and the guys at the nursery promptly delivered it to the driveway. With the standard in-town delivery fee of $30 and tax, I paid $140 for a healthy load of crap.
The tilled field before shaping into raised beds
The counter-spinning rear tine tiller was amazingly efficient, working in about a 1/6 of the time of my regular rototiller, I was able to save most of my energy for the task of hauling 48 full wheelbarrow loads of manure to various parts of the garden. Even with my best upper-body fitness of year from dozens of miles of cross-country skiing this winter, I was exhausted and in bed shortly after dark on both days. In the end, I had prepared the soil for 9, 25'x4' raised beds and felt the substantial hit to the checkbook was well worth it.
'Wild' (last years) green shallots saved from the tillers path