Saturday, July 10, 2010

Garlic Harvest 2010

That 'root' is wiggling; happy soil, happy plants!
9 months to the day after planting garlic cloves on a warm day in early November, this week I pulled-up my best garlic harvest ever! The soft-neck California white garlic cloves I bought at the La Montanita Co-op to use as seed garlic produced 100 impressively large and pungent bulbs; they're actually as big as store-bought garlic, yet much crisper and more flavorful! Click here to read my November post about planting these.

I had to use a shovel to lift the bulbs intact
After spending the cold-winter establishing their roots, the garlic leaves first emerged in early January. They must be made of anti-freeze....because....well, they didn't freeze on some damn frigid winter nights. In April I gave them a feeding of organic fish emulsion (high in nitrogen for leaf growth). I began consistently watering the two garlic rows in early April. By this point each plant had 8 - 12 leaves and stood 18+" tall, yet if you pulled one to eat as 'green' garlic you'd notice no swollen bulb at the base-- it doesn't start to swell until the summer. As summer approached I selected a couple plants to monitor the bulb growth by carefully removing the soil from around the bulb and checking them periodically. In mid-June, the bulbs were just starting to take shape and I gave the garlic it's last fertilizer, organic mori-bloom with a nutrient content of 0-10-10 (no nitrogen, and lots of phosphorus for bulb growth).

Before rinsing
By late June I reduced the amount of water they received so the soil wouldn't be overly saturated and lead to rotting of the protective white sheath covering the bulb. As the leaves progressively turned brown and shriveled, starting with the bottom-most leaves and then proceeding up the plant, I read everything I could on-line about when to harvest. Most advice on this matter takes one of two forms: either watch the bulbs closely and harvest when there are 2-4 sheaths remaining over the cloves (probably more precise), or , harvest when the top part of the plant (leaves) turn brown. Using the former method, I harvested on July 7th. The upper-most 2-3 leaves on the plants were still green, but the stalks were mostly dry and starting to fall over at their base. The timing must have been perfect because only a couple cloves emerged with their protective sheaths nearly gone (I'll keep all these to eat at home), and all of the others were intact and swollen to their maximum size. I'll sell all of the larger bulbs at the Gallup Farmers' Market this year and cook with the smaller ones.

Topbar Beekeeping Workshop in Ramah, July 17&18


The great people at the Ramah Farmers' Market (Association) have organized another fascinating workshop featuring another of New Mexico's sustainable agriculture super-stars (I missed the Tooley fruit tree workshop in the fall, but read about it in one of the fall issues of the Ramah Farmers' Beet)! For this workshop they've coaxed Les Crowder out of the Rio Grande valley and mountains of northern New Mexico where he frequently offers beekeeping workshops, and he's coming to Ramah on July 17 & 18. Please call Kate Wilson (RFM manager- 783-4704) to sign-up in advance for this workshop; they really need every interested person/couple to attend as they've barely met the minimum number of students that would make the long trip from Rio Lucio worth it for Les. Browse his website at www.fortheloveofbees.com

If you're unfamiliar with topbar beekeeping, it's promoted as a cheaper, simpler, and more natural alternative to the traditional method of using vertically stacked Langstroth hives. For more info on the workshop read the text in the photo above. To read my August 2009 post about beekeeping in Gallup, click here.

Other local bee/honey news: The Gallup YCC planned on expanding Karl's 3 hives to 12 this year with the honey for sale at the Gallup Farmers' Market later in the season. I'm unsure if everything went as planned; earlier in the spring Karl mentioned the bee colonies would arrive on May 19th. Last weekend I also learned from Kate Wilson that the Zuni High School is keeping more than a dozen hives this year and honey may already be for sale at Halona Plaza in Zuni!

Wednesday, June 23, 2010

Bragging about Broccoli

Two of a dozen broccoli heads almost ready for harvest
In my (almost too) densely planted bed of cole crops (cabbage, collards, brussels), the broccoli has done really well this year. In prior seasons I've experienced watching the newly formed flower heads quickly leaving the compact dome we're familiar with from the grocery store, and stretching into elongated stalks each topped with a small yellow flower. They're still edible and delicious, but it does feel really good to finally harvest broccoli that looks like it should.

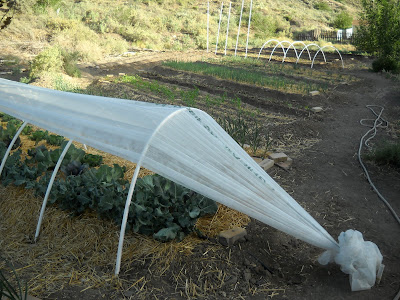
Low-tunnels in use and under-construction
The difference could be a number of factors with the soil, weather, or variety of broccoli but the most likely difference is using the fabric covered low-tunnel to shade the plants during hot days. I bought the dozen transplants from Holiday Nursery (can't recall the variety) and planted them on April 10th. The clay soil in the bed had been heavily amended with manure early that spring.

Frost and White Peaches

A June 8th peach blossom!?!

Catching up with old photos, I had to share the rather amazing site of my White Peach still blossoming on June 8th!!! Even with the rather cold spring nights we've experienced this year, that date is long after most varieties of peaches bloom. Most of which happens too early in the spring and a late frost kills the developing buds or fruit. A caveat though, my White Peach was severely water-stressed this spring and looked like it was dead. Only after realizing how dry the soil was in the small gabion-dam orchard did I give it a ton of water, likely saving the tree and triggering the late bloom.

The first Frost Peach

The more reliable peach variety in this region seems to be the aptly named Frost Peach. This variety is one of three different varieties I bought grafted onto a single trunk. The tree (branch) had numerous flowers well into late May, and in early June had produced this baby peach. If it can survive the phalanx of small finches that inhabit my yard, I'll enjoy my first home-grown peach in couple months. Regarding fruit trees in Gallup, my fingers are almost sore from being crossed so much, but I'm really hoping and wishing for this little sweet summer treat.

Tuesday, June 22, 2010

Hot Summer Days; Cool Summer Nights

Memorial Day tomato planting (40' row)
Summer 'officially' arrived early yesterday morning, though away from the numerical confines of our calendar it seems like our warmest season arrived more than a month ago. It's been hot! But of course, only during the day; Gallup's incredible diurnal shifts (daily difference between the daytime high temp. and night low) have been expectedly dramatic this month and the NWS forecast is calling for a low of 36 degrees tonight!
Arroyo gazing at the tucked-in peppers/tomatoes
This 50+ degree difference plays havoc with warmth-requiring crops like tomatoes, peppers, and cucumbers, and I've had to spend more evenings than I ever expected this month pulling the Agribon-19 floating row covers over the 180' feet of row space planted with this sensitive triad. I primarily chose to grow the Celebrity variety of slicing tomatoes, but I also included a half-dozen each of the large yellow tomatoes and husky red cherry tomatoes, and a dozen Roma plants for canning paste. Jalapenos, Santa Fe Grandes, and Poblanos filled the 30' of space alloted to peppers. The large diurnal shift also has an equal but opposite effect on cool-season crops; cool nights prolong the harvest contrasted with hot days that induce the bitter feeling (and taste) of watching the spinach, radishes, onions, and broccoli start to bolt. Having said that, despite a number of weeks with daily high's in the 90's, most of my cool season crops are still producing a decent harvest every other day or so. The snow peas being the least patient, demanding to be harvested just about every day or they'll quit producing at all. I've also been keeping up with the successional seeding of radishes every week or so, and I am about to start harvesting the 3rd planting. The carrots and shallots are growing well, but I haven't convinced myself that they're ready for harvest yet.
A 25' potato furrow about to be filled with sandy topsoil
At the start of the month I planted the 15 pounds of fingerling potatoes I blogged about earlier in the month, and by now the sprouts have emerged and are 2-4" tall. When most of them reach 5-6" tall I'll mound more soil around them, leaving only about an inch of growth showing. These buried stems are where the potatoes will grow. The potatoes filled 125' of row space, and I still have enough seedlings to plant another 25' row of the buttery and nutty tasting gourmet spuds.

Sorry about the long pause between recent posts; needed a mental vacation. I'll post more details about planting warm season annuals like summer and winter squash, beans, and the cucumbers soon. Also something about the various 6 or more legged creatures that my garden unwittingly sustains, and I'm going to try to keep up with and share the many events going on in the Ramah/El Morro area. Again, thanks for reading.

Wednesday, June 2, 2010

Snow Pea Peas

Pea with flower adornment
After much anticipation and many fretful frigid nights, the snow peas are flowering and more than living up to fecund reputation. The first day I noticed blossoms and peas hanging on the bed planted next to the warming rock wall, I ate all the peas I could find (12) on the spot. Two days later and the same plants I picked clean over the weekend are ready for another harvest.
Spinach ready for a second harvest in less than a week.

Friday, May 28, 2010

Fingerling Potatoes

Chitting in the front window
Potatoes should generally go into the ground around May 1st in this region, but I'm still going to plant a late crop of three different types of fingerling potatoes. They should be ready for the farmers' market by mid-August. Harder to find than regular potatoes (still available @ the Holiday Nursery), I ordered 15 lbs. of the Russian Banana, La Ratte, and Rose Finn fingerling potatoes from Peaceful Valley Farm Supply.
First glimpse of light
They cost the steep price of $4.99/lb, but should return quite a bit of that at the market. After receiving a tightly packed box from the growers in Colorado, I began chitting (pre-sprouting) the potatoes by placing them upright in empty planting trays and exposing them to medium light. Normally you would avoid allowing potatoes to green (the color denotes the bitter alkaloids found in the greenery of all members of the nightshade family), but in seed potatoes it helps them get a quicker start once they get in the ground. Something I need, planting at the beginning of June. I'll plant these in a 25x4' row with 3 sandy soil filled trenches in the natural clay soil of the row. Then I'll try not to overwater them, and fend off the grasshoppers with Nolo bait. Fingers crossed.

Monday, May 24, 2010

Radishes, Spinach, and Onions @ the Co-op

Co-op delivery waiting on the front stoop
Today I learned the Gallup Farmers' market opens on July 10th of this year. Quite a bit later than I was expecting. I was planning on it opening in June so now I'll have a fair bit more produce to sell to the La Montanita Co-op during the early season-- the first snow peas are already flowering. Just in time for a 25 degree night!! Ahhh. Blanket brigade tonight.

I'm getting hung up think months ahead. Just this afternoon I harvested 2.5 lbs of large green onions, 2.5 lbs of bright red radishes, a decent basket of long leaf spinach (oh, it's so sweet), and another ubiquitous basket of baby salad greens. It should be on the co-op shelves by today.

Friday, May 21, 2010

More Spring Greenery

Young Scarlet Nantes carrot

Long leaf spinach planted in early April

Shiitake mushroom left to its own devices

Shallots grow with many more leaves than onions or garlic

Radishes growing amongst the lettuce

Thursday, May 20, 2010

Food Miles

Sadly I drove this basket to market instead of pedaling
Much of the food selection we have available to us at the supermarket is determined by the practical reality of how and when that food gets to the market. I can now empathize a little more with the growers of those thick-skinned cherry tomatoes and unripe bananas. The problem I'd been struggling with was how to get my lettuce to the Co-op in the freshest condition. Cutting lettuce when it's cold (ie. in the early morning) is much preferable to cutting it during the heat of the day (when I get home from work); it won't wilt as quickly and it's sweeter. I generally leave for work by 7 and the co-op doesn't open until 10. Consequently, I was hesitant to bring more to market.

A serendipitous encounter with the manager of the Co-op at the RMCHS Health Fair (I can't believe one of the main attractions is candy at each booth!?!; Gallup Trails 2010 passed out maps instead!) yesterday solved that. Clearly dedicated to providing Gallup with fresh, healthy, local food, she immediately offered to meet me early in the morning several hours before the store opens when hearing of my concern. And so, there I was a few minutes ago in the crisp morning air cutting the first harvest of my baby red and green lettuce mix-- grown under bed sheets at first, and now under the low tunnel. Cutting a 2'x 2' area of the bed nearly filled half of a bushel basket. I'll also bring down green onions and some radishes later this afternoon.

Not surprisingly, I'm not the only one starting to make a few dollars growing food at home. Check out this LA Times article, Backyard gardens become income generators in lean times.

Wednesday, May 19, 2010

Container Crops

Containers awaiting soil and seed
So, sometimes I awake at 1 in the morning panicking that I haven't brought in the flats of transplants or handful of containers susceptible to the precipitous nighttime lows of a clear spring night. Most often it's a well placed emotion and i'll don my favorite Patagonia 'dirtbag' jacket and a pair of Crocs and then spend the next 5-15 minutes carrying flats inside or spreading bed sheets over sprouting rows in the sharply cooling night air.
Container Tomatoes
The most strenuous of these middle of the night tasks is carrying in the 5-gallon containers of cherry tomatoes. While strong fingers and back are a pre-requisite for repeatedly carrying 40 lbs. of damp soil around the house past midnight, I've found the determining factor is mustering the gumption to get out of a warm bed. Sometimes I gamble and stay in bed. I've been lucky this year. And yet despite the up-front costs, the benefits of starting some tomatoes and peppers early in containers will come with time. The key is both are perennials in their natural environment and moving large containers of soil around the yard and house, while cruel to the back, effectively simulates theyear-round growing season. And, oh, their so tasty when the first snow starts to fall in November.
Life is the best art: uneaten thai peppers
I've grown cherry tomatoes and thai hot peppers in containers for the past two years (they also grow better in the ground), and brought the fruiting fall plants inside to my classroom. The harvest continued well through October, but I only let the students sample one of the two fruits. The latter being hotter than fire, and so damn pretty I couldn't bear to uproot the plant or harvest the pods (I also had a ton of outdoor grown thai red peppers already preserved). Numerous varieties of peppers and tomatoes have been selected to excel in the confined root space of a large container and offer a great low-cost season extender for anyone with large south-facing window and some commitment. I've read numerous accounts of digging up and transplanting different pepper varieties at the end of the summer to keep through the winter and then transplant again as well developed plant. I've yet to try it. Maybe this year. Another weird container planting concept is the upside-down hanging containers for tomatoes and other indeterminate vining perennials. Check out this recent NY Times article, Growing Vegetable Upside Down. The technique seems to have some salient attributes in certain circumstances like gardens with limited space and problems with soil-borne pests.

Hanging Hops

The tallest vine is 23"
The historically famous hop growing regions of the world are found around latitude 48, where long summer day-length allows vines to quickly grow upwards of 20' tall. By contrast, Gallup lies around latitude 35, with considerably shorter summer days. Despite this hops can still be grown here. To compensate for the shorter days I've placed my hops in a full sun location and found they grow well even in the summer heat as long as they get tons of water. Second only to very rich and wet soil, I've found the key to having healthy vines is limiting wind damage to the vines and leaves. While frost tolerant, very cold temperatures below 27 degrees, can also hurt early growth.
Rigging up the trellis
After selecting the most vigorous vines to grow to maturity (the others are trimmed and this year I'm experimenting with transplanting the clippings- so far they seem to be taking), they need to be trained around a sturdy, tall, and taught trellis. Professional hop growers use 18' coconut coir twine, known for its strength and rough texture, for the trellis. I just use cotton twine tied to a 13' ponderosa pole. This year I was a week or two late rigging up the trellis, and a strong wind storm seemed to damage most of the leaves on the vines that had already grown to 2' in length. They seem to be recovering well and I hope to have a decent hop harvest in September.

Tuesday, May 18, 2010

Low Tunnel Season Extenders

The low tunnel with sides vented open
I'm so excited about my new low tunnels, a small inexpensive version of a green house or hoop house. They'll serve dual purposes: warming the beds on cool nights and either warming or cooling during the day, depending on which crops they cover. The greens and peas will be kept cooler by opening up the side of the tunnels to vent out the heat and shaded by the 85% light transmission of the fabric. Tomatoes, cucumbers, and peppers will be kept warm day and night by venting the sides less.
The baby lettuce and spinach crop should be ready for the 1st farmers' market of the season

The key ingredient was purchasing a 250' roll of 83" wide (almost 7') row cover fabric called Agribon 19. The extremely light synthetic fabric lets light, water, and air through to the plants but does retain enough heat to provide 4 degrees of frost protection on cold nights. To build a 25' low tunnel I used 3/4" plastic PVC pipes spaced at 30" (10 pipes covers 25' and costs around $18. The pipes are bent and fastened to wooden poles (with electrical conduit straps)that run the length of the bed. Once my pipes retain some of their bent shape with time, I may try the more traditional method of inserting the ends of the PVC into pre-drilled holes in the soil. The fabric is then spread over the frame and the two ends are pulled tight and fastened with rope to a deeply driven stake. At this point the fabric will hold it's place (vented open or closed) in up to moderate wind. But we don't get just moderate wind around here so I'm going to run a piece of string or cord over each hoop, trapping the fabric between the string and the pipe. Sandbags will also be used to weight the fabric down when needed. On days when extreme wind is forecast, I'll just slide the fabric completely to one side of the hoops, and bunch it up against the ground with a heavy weight on the top; why fight the wind with nearly transparent fabric. The final cost for each tunnel breaks down this way: fabric $6; pipes $18; pipe fasteners $3; string and screws $3.

Monday, May 17, 2010

Spring Starts Indoors

If all of life were this simple: soil+seed+water= life
Do we really learn from lessons of the past? In terms of gardening in the high desert, it seems the 'lessons' to be learned are endless, and each situation is just different enough from those of the past to leave me guessing anew each time. The catalyst for this line of thought runs deeper than these little pots, but it does intersect with these huge squash seeds-- after starting 9 flats of various squash, I reconsidered and wished I had waited and started them straight in the soil. Hindsight is 20/20, huh?
Waiting to be tucked in
A few years ago I started tomatoes, peppers, and various herbs inside in mid-February. 6 flats stayed warm, and then illuminated by 3, 4' fluorescent shop lights. All but the peppers grew into respectable starts. However, keeping starts alive in your kitchen for 4 months before they can be planted in early June is far from ideal. Each day I would shuffle the flats around the house seeking the best natural light, and daily misting from above and weekly soakings from below kept the roots healthy. Did I mention this continued for 4 long, long months! In the end they all transplanted well and I had no problems with the starts being root-bound. So this year I'm applying the lessons learned from that year, and I waited until the first week of May to start my seeds; it seems a little late.
A new era?: plastic protects the floor. Ha.
This year I'll have to buy my tomato and pepper starts. The former taking too long to start now, and the latter never grew beyond the second set of leaves in my cold house and inadequate lighting. To start the thyme, basil, cucumbers, and squash I used the seed starting mix recommended by the nursery, Fertilome's Ultimate Potting Mix. It's an extremely fine mix of peat and compost with no wood products in it (great for dealing with very small fragile seed starts), and it completely lived up to its strong recommendation.
immature 'food' on the kitchen table
In the past I've also struggled with how dense the planting media should be when starting seeds. Too dense and the roots seem to start slowly and prone to damping off or rotting. Too loose and the roots get damaged when transplanting as the soil falls apart as you pull the plant from the plastic 6-pack. My technique this year was loosely fill each 6-pack to the brim with soil. Then I carefully banged each 6 pack on the floor which uniformly packed the soil in each cell, leaving an inch of free space at the top. I then pressed each seed onto the top of soil. Depending on seed type (bigger seeds are buried deeper), I filled the remaining space in each cell back up with more uncompacted, fluffy potting mix. Unlike, many cheaper brands of soil that are very dry coming out of the bag, the Fertilome mix was already moist when I bought it, but it still needed to be wetted after planting the seeds. Rather than watering from above which compacts all of the fluffy mix around the seeds, I placed each flat in my utility sink filled with warm water for 20-30 seconds. The potting mix wicked up water from below, wetting the soil and seeds perfectly, but not collapsing the delicate soil structure. Finally I covered each flat with plastic wrap and placed them in the warmest part of my cold dusty cottage. After 4 days the emergence began with the warmest cucumber flats and has continued steadily over the past 2 weeks as each seed variety comes up for light.